One of the most advanced techniques I teach to my food photography mentees is how to use liquify in Photoshop. It is one of my secret weapons in food photo editing and it blows my students away when they first see it in action!
This 20-second fix SAVED this image from my laptop's trash bin. Once you tackle how to use it, you will see the opportunities for using it everywhere!
After our summer retreat, I had the perfect opportunity for a little explainer, so I recorded myself editing a photo with Photoshop's liquify tool. The goal in this tutorial was to save a very wilted cucumber and give the image a fresh and appealing look. Here is the before and after.

Shot with Canon 100mm Macro Lens (one of my favs!)
Our beautiful cucumber ribbon had gone pretty flat after sitting in the outdoor table scene for awhile. This problem is commonly known as the food ‘going dead' or simply ‘dead food'. I really liked the rest of the photo elements, but I couldn't let go of the cucumber. Especially when I know how nice it looked when Chef Travis first brought it out!
Watch the quick tutorial on how to use liquify in Photoshop below!
Here's a step-by-step breakdown of how to use liquify in Photoshop. It took me maybe 20 seconds to complete, and the image is completely transformed.
Step 1: Open the Image and Create a Duplicate Layer
The first step is to open your image in Adobe Photoshop. Once you have it open, create a duplicate layer by pressing “Command + J” (or “Ctrl + J” on Windows). This duplicate layer will allow us to make changes without altering the original image.
Step 2: Enter the Liquify Tool
Next, navigate to the Liquify tool. You can find it under the “Filter” menu. The Liquify tool is a powerful feature in Photoshop that allows you to distort and manipulate specific areas of an image, making it perfect for our task of saving the wilted cucumber.
Step 3: Adjust the Brush Size
In the Liquify tool, you'll see a brush that you can use to make adjustments. Make sure your brush size is a bit larger than the area you want to modify. In this case, it's the cucumber.
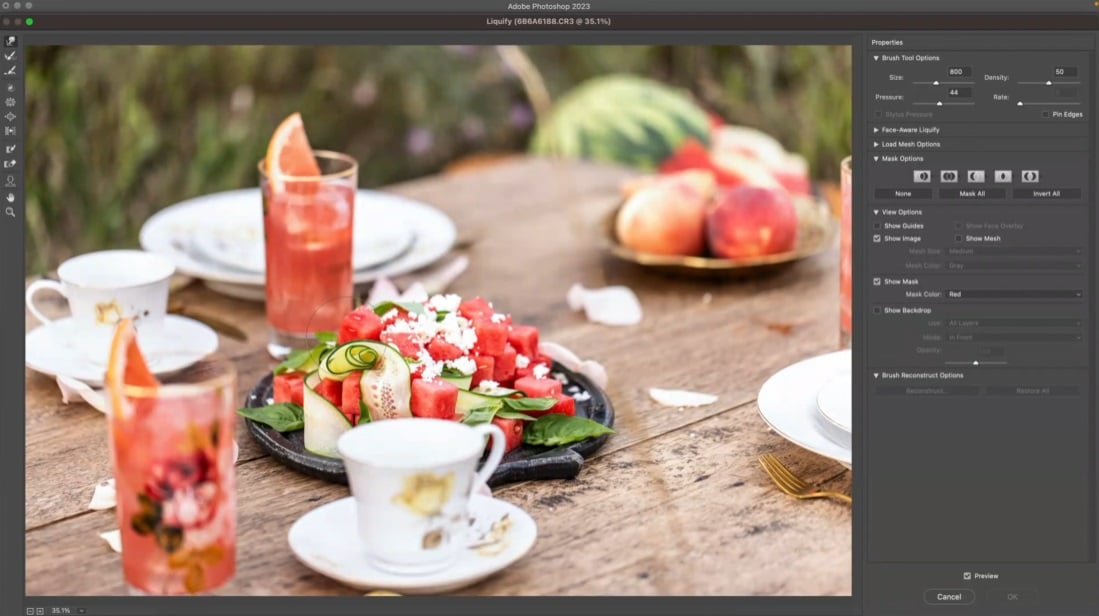
Step 4: Start Reshaping
Begin by using the Liquify brush to reshape the cucumber. Try to match the curve and shape you want to achieve. Remember that when using this tool, you should follow the direction of the object you are modifying to maintain a natural look.
Step 5: Maintain Form
It's important to maintain the form of other elements in the image that shouldn't be altered, like the drink in this example. Be cautious when making adjustments around these objects, and follow their contours to avoid distorting them.
Step 6: Preview Your Changes
After making the necessary adjustments, preview your changes to see how they look. This step helps you assess whether your modifications appear natural and appealing.
Step 7: Final Adjustments and Saving
If you are satisfied with the changes, click “OK” to apply the Liquify adjustments to your duplicate layer. You can always go back and make further refinements if needed.
Like these lifesaver tutorials? Comment down below what other quick fixes you'd like to see!
If you are interested in a more in-depth editing demonstration, check out my Behind the Scenes Drink Photography lesson which includes a full edit of the final image!


I’m gine to tell mmy little brother, that he shoupd
also ggo too see tyis weblog on regular basis to
obtain updated from most recent information.
With havin sso much content aand articles do yoou ever run into any probles of plagoris orr
copyriht violation? My blogg hass a lot of exclusive contenbt I’ve either crteated mmyself orr outsouurced
but iit appears a llot oof iit iss ppping it uup alll over the iternet without myy permission. Do you know any
methoods to help prdotect against content from beinmg ripoed off?
I’d certainlpy appredciate it.
of course like your website but you have to check the spelling on several of your posts A number of them are rife with spelling issues and I in finding it very troublesome to inform the reality on the other hand I will certainly come back again
Hi, I think your site might be having browser compatibility issues.
When I look at your blog site in Safari, it looks fine but when opening in Internet Explorer, it has some overlapping.
I just wanted to give you a quick heads up! Other then that, very good blog!
Have you ever considered about including a little bit more than just your articles?
I mean, what you say is important and all. However imagine if you added some great graphics or videos to give your posts more,
“pop”! Your content is excellent but with images and video clips, this blog could
certainly be one of the greatest in its field.
Very good blog!
Hello there! Do you know if they make any plugins to assist with SEO?
I’m trying to get my blog to rank for some targeted keywords but I’m not
seeing very good results. If you know of any please share.
Cheers!
Generally I don’t learn article on blogs, but I
would like to say that this write-up very pressured me to try and do it!
Your writing style has been surprised me. Thanks, very nice post.
Definitely consider that that you stated. Your favorite justification appeared to be
on the net the simplest thing to take note of.
I say to you, I certainly get irked while people consider issues that they plainly do not realize about.
You controlled to hit the nail upon the highest and defined out the whole thing
with no need side-effects , other people can take a signal.
Will likely be again to get more. Thank you
Your blog is a great source of positivity and inspiration in a world filled with negativity Thank you for making a difference
What’s up it’s me, I am also visiting this web page daily, this site is in fact pleasant and the people are
genuinely sharing fastidious thoughts.
I was recommended this blog by my cousin. I’m not sure whether
this post is written by him as no one else know such detailed about my trouble.
You are incredible! Thanks!
Good day very cool site!! Guy .. Beautiful ..
Amazing .. I’ll bookmark your web site and take the feeds additionally?
I’m satisfied to seek out so many helpful info right here within the post, we’d like develop more techniques on this regard, thanks for sharing.
. . . . .
Article writing is also a fun, if you be
acquainted with afterward you can write or else it is difficult to write.
Oh my goodness! Incredible article dude! Many thanks,
However I am experiencing issues with your RSS. I don’t know the reason why I cannot subscribe to it.
Is there anybody having identical RSS problems? Anyone that knows the solution will you kindly respond?
Thanks!!